 My Sights on RoadsideAmerica.com
Plan your personal exit strategy!
My Sights on RoadsideAmerica.com is a free web tool we created (primarily for desktop computer use) to help you select and save places you read about on RoadsideAmerica.com. You can plan out a whole trip of nutty stops, then print a route or export POI data for your GPS device (Garmin, TomTom, etc.).
- 1. Finding and Selecting Places
- 2. Using the My Sights Trip Planner
- 3. Create a Route, Print a Trip Map and Directions
- Bonus: Share Your Road Trip
- Bonus: Export GPS POI Files
- System Requirements
- Troubleshooting
1. Finding and Selecting Places
To use My Sights, you gather a "wish list" of places -- landmarks, museums, statues and tourist traps. You can find places by searching and surfing around RoadsideAmerica.com, and clicking on an attraction's Add to My Sights checkbox.
 All "mapped" places on RoadsideAmerica.com display a checkbox. You can start at the RoadsideAmerica.com Home Page and pretty much anywhere you click will lead you to stories and tips with My Sights checkboxes. Go to Home Page
 Another excellent place to select destinations is on a map. You can Map-a-City, or find places on any state map.
State and Province Maps:
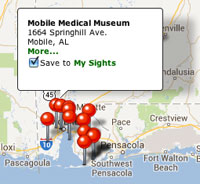
Click on any red pushpin on the map. You'll see facts about the attraction and a "Save to My Sights" checkbox. After you've saved several attractions, you can start organizing them into a trip.
In My Sights, you can store up to 75 attractions. You can come back days later to add to and refine your saved trips, as long as you don't delete the browser cookies on your computer (see more on this below).
The next step is to view the list of places you've accumulated, and start organizing them into an actual trip...
2. Using the My Sights Trip Planner
Use either Map-a-City or the state map pages to select several attractions by first clicking on the red pushpins and then the "Save to My Sights" checkbox.
To see a list of the places you've selected, click on the Save to My Sights link on any attraction page, or just click on the My Sights link in the page's top navigation bar.
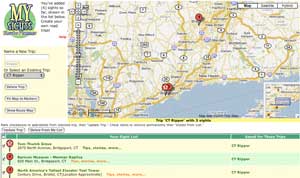 The My Sights Trip Planner will display a map (The map does not have any pushpins yet). Below the map is your list.Now you can start to choose from your list to put together a Road Trip -- a day trip around one city, a state tour, a cross-country
adventure. Create and save up to 5 Trips!
The My Sights Trip Planner will display a map (The map does not have any pushpins yet). Below the map is your list.Now you can start to choose from your list to put together a Road Trip -- a day trip around one city, a state tour, a cross-country
adventure. Create and save up to 5 Trips!
Select a few places on Your Sight List of destinations by clicking the checkbox next to their red pushpins. As you select each, a push pin marker will appear on the map. If they are grouped close together, you can click the Fit button at the top of the page for a better view.
Now type in a trip name in the Name a New Trip field, click Create, and the places on the map are saved as part of that trip.
If you want to make changes, click or unclick the checkboxes next to the attractions you want to change, then click the Update Trip button at the bottom of the list to resave the trip. You can mark and unmark attraction checkboxes as much as you want -- just remember to click the Update Trip button to save your Trip choices.
[RA Sez: Trip Names should be short - 2-4 words, descriptive, unique. Ex., Redwood Giants, Boring Museums Day 1, SW Iowa Statues.]
Trip Maps can contain up to 30 attractions. The same attraction can be saved on more than one Road Trip, so you can plan alternate versions of a trip.
[RA Sez: Make a separate Trip Map for each day or two rather than a 10-state monster map.]
3. Create a Route, Print a Trip Map and Directions
When you're ready and have a trip selected and loaded on the map, click "Show Route Map." You will advance to the Route Planning screen (map/trip/route), where you can make a final selection of places, arrange them in the order you'd like to visit, and then automatically generate a suggested trip route.
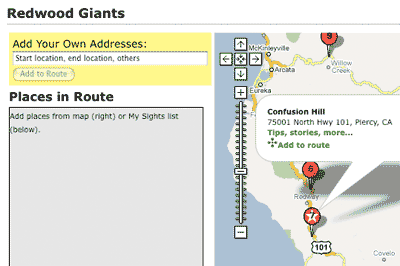 Add Your Own Addresses
First, you may want to type in a start and/or end location -- your home address, a hotel or friend's address, etc. -- so they will be incorporated into the route. Type each into the "Add Your Own Addresses" field and click "Add to Route." When you do, each address appears in the "Places in Route" list (but not yet as a pushpin on the map). To add more than one address, delete the text in the "Add Your Own Addresses" field, and type in a second one, and again for as many addresses as you need. Don't worry, you can rearrange the order later.
[RA Sez: You can also type in addresses for places we don't know about or haven't mapped. If they turn out to be great, send us a tip and we may add them.]
Places in Route
Now add places to your route. On the map, click on any pushpin, then select "+ Add to route." You can also select from the My Sights list below the map. As you select each place, it is added to the Places in Route box.
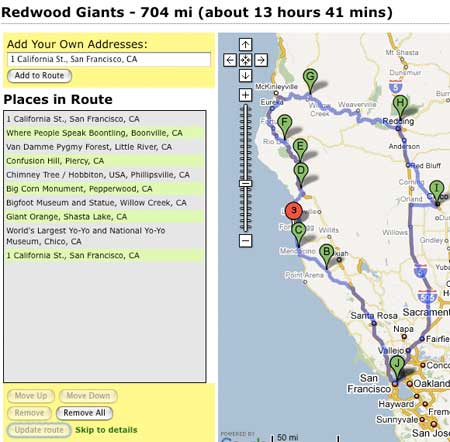
Plot Your Route
Click on one of the Places in Route and it will highlight in yellow. Then use the buttons at the bottom of the Places in Route list to move the highlighted place up or down, or to remove it.
Show Route
When you have a final order, click the "Show Route" button at the bottom of the "Places in Route" list. In a moment, a suggested route will overlay on the map.
You can adjust the order or remove places, and click the "Update Route" button.
When you've selected the places you want, and have them in the order you want, click the "Skip to Details" link at the bottom of the list to create a complete point-to-point set of directions and estimated miles and travel times.
Print Map and Directions
Use the "Print" button at the end of the directions to create a paper copy of your trip route and directions. You can also click the "Print" button at the upper right corner of the map to create a paper copy of the trip map.
Share Your Road Trip
Not all trips are solos. You can share your trip, attractions and map with family and friends. Click on the Email Trip to Friends link, add email addresses, and send. Link may not work in some email applications -- cut and paste!
Roadside America preserves shared trip data file on our servers for 1 year, then deletes the file.
Export GPS POI Files
If you have a portable GPS device, you can save your My Sights Trip places to a file that can be imported and used just like other POIs. the file will be: RoadsideAmerica-Your-Trip-Name.csv.
Caution: some places are mapped to best estimated location rather than precise coordinates, so please don't trust your car to drive itself based on our data. We figured once you're in the neighborhood, you could sleuth out the exact location (and let us know if you have better coordinates so we can update our files). GPS POI data is provided as is, with no guarantee of its accuracy.
System Requirements
Allow Cookies, Don't Delete!
My Sights won't work unless you enable cookies in your browser. Make sure your browser preferences for cookies are set to allow the My Sights cookies to remain until they expire
If you decide to delete My Sights cookies, your list is deleted and must start over! We keep no information about your personalized list.
Browser
My Sights works pretty well on desktop Chrome (PC, Mac), Firefox (PC, Mac) and Safari (Mac). It may work for you on a mobile device browser. If you're having problems, please try it in an alternate browser.
Javascript
You must have Javascript enabled/turned on in your browser for My Sights to work.
Technical Support
We can't offer direct technical support for problems encountered with this free tool, but we will continue to refine My Sights. Submit feedback. Let us know what the problem is, what platform and browser version you're using, and verify that you have cookies enabled and javascript enabled.
Troubleshooting
You've added places to and viewed the list in My Sights in the past, but now they're not showing up.
This may mean in the interim you deleted the RoadsideAmerica.com cookies in your browser which keep track of the list. Don't delete the cookies. If you use two or more browsers on your computer, perhaps you created your list on another browser....
You've added a number of places to My Sights, and now you only see a few of them in your list
My Sights has TWO main screen views: 1) The initial screen with your list and the controls to create and name new trips.; 2) The Route Mapping screen, where you work with one trip you created to arrange the order you'd like to see places. So you might be looking at that second view when you really want to go back to the first screen, where you'll find all of your places.
After putting a trip's places in order in the "Places in Route" box, the turn-by-turn route directions are not appearing
This might be because one of the places you chose is not supported by Google's turn-by-turn feature (we discovered this when it couldn't find the way to Four Corners, AZ, which was apparently too far off official roads). One bad location may prevent the route from building. Please take a look at your list of places, and if any are way off regular roads, try removing just those from your trip and click "Show Route." If that's the culprit, please let us know so we can adjust our location data!
Trip planning caution: Maps, directions and other tourist attraction details are offered as a convenience to our users. RoadsideAmerica.com provides all information as is, and makes no warranty regarding its accuracy. Attractions may close or hours vary, street addresses change, and attraction records may include errors. For a more flawless trip, always verify with other sources, or with the attractions by calling ahead. |